Photo Gallery
To create a new photo gallery to be applied to an interior page, use the New > Interior Page > Photo Gallery > Gallery Asset Factory. This will create a new folder with a folder for large images, a folder for thumbnail images, and a block that contains information for the gallery.
Once you have created your gallery, you can use the documentation for structured pages to apply it to your page.
In this Section:
Photo Gallery Images
If you have created a new folder for your photo gallery, you can find it by name in your site's /images folder. There is one placeholder for large images, located in the /large folder of your gallery, and one for thumbnails, located in the /thumbs folder. You should delete these when your gallery is finished, but use them initially as a help for sizing.
When you upload an image of either type, you can give it a filename. Do not use spaces or special characters. Separate words with dashes or underscores. Always end your filename with .jpg, .png, or .gif (.jpg is most common for photographs).
When you upload an image, look for the Choose File button, and select the image from your hard drive.

Large Images
Large images can be as big as their container. If you have a right sidebar on your page, this leaves you with about 475 pixels. If you do not have a right sidebar, this leaves you with about 720 pixels. You can create gallery images at the width for your page, and whatever height you like. Keep all large images the same size. You can add new large images by using the New > Interior Page > Photo Gallery > Large Image Asset Factory.
Thumbnail Images
Thumbnail images should be sized to a maximum of 75 x 75 pixels. They should always be square, even if they are smaller than that size. Keep all thumbnail images the same size. You can add new thumbnails by using the New > Interior Page > Photo Gallery > Thumb Image - 75x75 Asset Factory.
There is a placeholder image for thumbnails that allows you to see the sizing. You can replace this by clicking the Choose File button shown above.
Photo Gallery Information
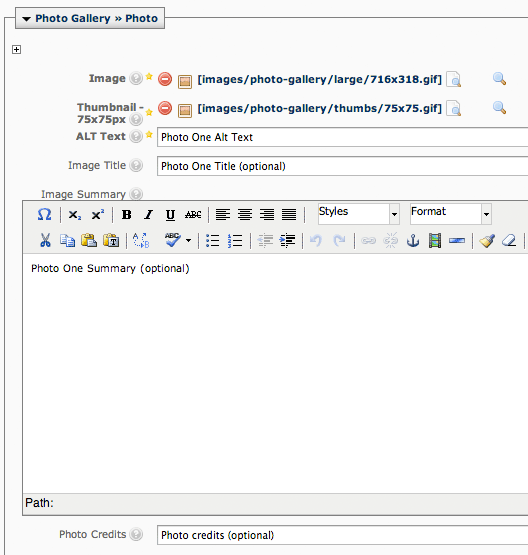
You will find the information for your gallery in the same folder with the images, in a block called gallery-data. If your gallery is new, there will be some placeholder information. You will want to delete or replace this before publishing a page with your gallery.
Each photo has its own set of information.
 |
To create an additional slide, click on the + (plus sign) icon. This will create a new link entry as detailed above. |
 |
To move a slide up or down in the list, click on the up or down arrow icons. |
 |
To delete a slide, click on the minus sign icon next to the link. |

Image Files
To add image and thumbnail files, browse to the image you want to insert by clicking the file button  , navigating to the images folder, and selecting the image. The image field is required.
Text
Alt text is a required field. Enter information that helps people who can't see the images - users on assistive devices, search engines, etc. - understand what the image is.
Image title is an optional field. If you use it, it will display as a heading. Keep this short.
Image summary is also optional, and will display as normal text. Keep this short as well - one sentence is a good rule of thumb, though if they are small you may be able to fit two in the space.
Photo credits are optional, and allow you to indicate who has provided the photo. If you do, it will display next to the title, in small text.
